How Authors Can Use Word’s Track Changes to Review Editorial Suggestions
L.C. Scott is the founder of eFrog Press and an author. Her many years of teaching at the high school and university level and her freelance writing career have prepared her to lead a team of experts to guide both fledgling and experienced authors through the maze of indie publishing. Today on Take the Leap she shares how she explains the use of Word’s Track Changes for authors.
Word’s Track Changes tool is a wonderful resource for both editors and authors. It allows an editor to add comments into the document and also to make changes that the author can later review and accept or reject. But authors unfamiliar with this tool can be confused when they receive the book’s file with Track Changes implemented.
So, if you are an author new to this feature in Word, I am going to demystify the process of using Track Changes to respond to your copy editor’s comments and edits.
Viewing Edits in Track Changes

When you open your file in Word, the Track Changes should appear in your file. If you don’t see them, go to the Review Tab and click on the Track Changes button until it is highlighted in orange like the example above. Now your edits should appear in the document.
How to Use Track Changes to Review Editorial Suggestions
One of the easiest ways to use Track Changes is to go to Review Tab > Changes section (see far right in graphic above) and click the Next button. You will be taken to the first editing suggestion. Then you can click the Accept button with the blue checkmark or the Reject button in red.
From the drop-down arrow under both the Accept and the Reject buttons you will be given the option to move to the next edit. There are other options like right clicking on the edit itself, but I find the Accept/Reject buttons are the easiest way to move through a long document and view each suggestion from the editor.
Comments Box

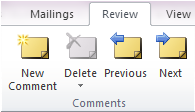
You may also see comments from your editor in a Post-it-Note-like box in the margin. Once you read the comment, you can click in the box and then click the Delete icon in the Comments area shown above. To view your next comment, just click Next button in the Comments section.
How to Enlarge Text in Comment Balloons
The text in the Comments is often very small and can be difficult to read. One of the authors we worked with printed out her edited pages and the text in the Comments was so tiny, she had to use a magnifying glass to read the copy editor’s suggestions. I knew there had to be an easier way—and there is. I created a video tutorial to show where this powerful feature is hidden within the bowels of the Word program. Hint: You need to go into Styles—a dark and scary place! Fear not, this video tutorial is better than Hansel and Gretel’s breadcrumbs and will lead you back to safety with a readable font size in your Comments Box.
Things I Learned the Hard Way
- Always save your file with a new name before you begin accepting changes. You might want to refer back to your copy editor’s comments later.
- If you read through your file and agree with all the edits, you can click the down arrow under Accept button and choose Accept All Changes in Document. Done!
- Once you have completed your review and accepted or rejected all changes, you can turn off Track Changes by clicking on the Track Changes button until it is no longer highlighted. If you do not, it will hang on like gum on the bottom on your shoe!
My focus in this blog post is how to receive and review feedback in Track Changes. In a future blog post, I will tackle how to use the Track Changes tool to send feedback.
Please Share
Would love to hear about your discoveries with this powerful editing tool! Please share in the comments box below.