Need New Business Cards Now? What’s an Entrepreneur To Do?
L.C. Scott is the founder of eFrog Press and an author. Her many years of teaching at the high school and university level and her freelance writing career have prepared her to lead a team of experts to guide both fledgling and experienced authors through the maze of indie publishing. Today on Take the Leap she shares how she makes custom business cards to keep up with her rapidly changing business—DIY, of course!
Although I am a big fan of sites like Vistaprint and Moo Cards, I prefer to design and print my own business cards until I get the content and design just the way I want it. As an entrepreneur with a young business (2 ½ years old), I know things can change quickly.
Three days before a big networking event I realized my business cards were lacking. No time to order online, so I resorted to DIY.
Now I did have a cool logo to use. My brother-in-law is a wildlife artist and sketched a frog sitting on an iPad (instead of a lily pad). Perfect for eFrog Press, as we started out with a focus on creating ebooks. Never seen a frog with fingers? That’s a northern leopard frog or Lithobates pipiens. Really. Here’s proof.
How to DIY Professional Business Cards
Don’t have a color laser printer and industrial paper cutter? No worries. You can still create professional looking business cards.
I love Avery’s linen cards. The rich texture gives a custom look to homemade cards. Also, Avery has greatly improved their perforation methods. No longer are your cards marred by little bumps that reveal to all that you punched them out of sheets of perforated cardstock. Avery’s Clean Edge business cards pop out with smooth, flawless edges. My personal favorite is Avery® Linen Textured Two-Sided Printable Clean Edge Business Cards for ink-jet printers.
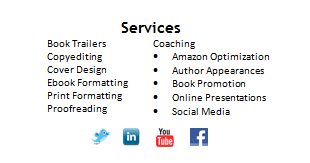
The other feature I love is the printable backs. I was able to free up an increasingly crowded front side and list our services on the back. For a touch of color and to highlight our social media presence, I decorated the bottom edge with social media icons.
Business Card Content
Let’s talk about content. Of course you want logo, business name, and your name front and center—or at least front! Be sure to include your website so people can learn more about your business and remember why they have your card when they clean out their wallets.

You want people to contact you, right? So why put your email and phone number in 7-point font? As I age my near vision fades, and I resent having to use a magnifying glass to read a phone number when there is plenty of white space for a bigger font!
As eFrog Press has evolved over the last 2 ½ years, it has been convenient to add new services to the back of the card. Of course, not all businesses have changed as much as publishing services in recent years, but all successful entrepreneurs sharpen their focus and need to update their business cards to reflect those changes.

Designing Your Business Cards
Avery provides templates but I just use Microsoft Word. Follow these steps to create your own business card using Word. (I use Office 2010, so depending on the version of Word you are using, some of these steps may be different).
1. Click on Mailings tab (I know you’re not mailing anything but this is the secret location).
2. Click on Labels (top left).
3. Click on Options (bottom left of new window) and scroll through until you find the Product Number for the business card stock you are using. Mine are Avery #8873. Then click OK.
4. In the print box (middle left) choose the option Full page of the same label.
5. On the bottom click the button New Document.
6. There will now be business-card-size rectangles on your Word document. Enter your information in one rectangle and format. Experiment with color, font, size, and location. You can insert your logo, too.
7. When your card looks exactly the way you want it to, check print preview or print one copy in grayscale (to save precious color ink).
8. When you are happy with your card design, copy the content and paste it into each of the empty rectangles.
9. Go to View tab and choose One Page to make sure all your information is inside the dotted borders.
10. Be sure to save your file!
Printing Tips (all learned the hard way)
- Print the front side in grayscale on regular paper first.
- Before hitting print, pencil in the words “Facedown Bottom” and then place that side facedown and at the bottom of printer paper drawer. Notice how it prints so you understand how to place your cardstock in the printer.
- Then turn over the paper you just printed (face up) to print on the back of the paper.
- Now you are ready for lights, color, action! Or at least ready for cardstock and color!
Use your new custom cards and modify as needed. When you are happy with your card’s content and design, it may be time to go to a local printer or an online service such as Vistaprint or Moo Cards to order in quantity.
Please share any business card tips you have discovered in the comments box. I’d love to hear your tips and tricks!
Tags: Avery business cards, business card design, business cards, business cards for entrepreneur, DIY business cards
